
“Christmas waves a magic wand over this world, and behold, everything is softer and more beautiful. ” – Norman Vincent Peale.
Gosh, we’re already on our second Christmas nails post? Christmas is quickly approaching and I don’t know whether this excites me or terrifies me (I still have Christmas shopping to do!), but it’s still reassuring to know that we still have another two weeks. Now, if you have not yet read Christmas Inspired Nail Art #1, make sure you do, or you may miss out on a design you really like.
Similar to last week, this week I am starting off with a Christmas tree nail design.
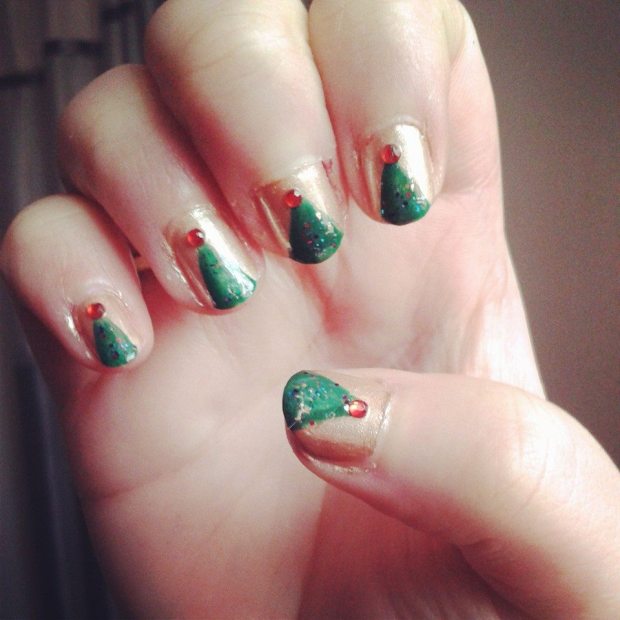
Here we have a collection of Christmas trees. At first, I worried that the gems would be a bit too much, but I actually really like them (although, if you don’t, you obviously don’t have to add them).
To create this design I painted all of my nails a light shimmery, gold shade. This nail polish in particular is Umberto Giannini‘s Painted Lady, Lady Luscious nail polish, which you may recall me mentioning last week. Next, using my green striper from my Rio Professional Nail Art Kit (also mentioned last week) I painted a large triangular shape taking up approximating a third of my nail and filled it in. This is the Christmas tree, but as we all know, Christmas trees are covered in decorations, including tinsel and lights and baubles. As a result, for my decoration, I added a little bit of glitter nail polish over the tree. To do this I used Barry M‘s Glitter Nail Polish in Amethyst Glitter.
Once the above was complete, I felt something was missing. I knew that I needed some kind of tree-topper and I felt that the design was lacking red – a colour much associated with Christmas – so I decided to go for a red rhinestone from a pack I bought off Amazon and stuck it to the top of my trees. Alternatively, you could paint a star, or even a simple dot to represent a shining star.
As much as I love the above nail design, this next one has to be one of my all time favourite nail designs, despite it being a bit more wintry than it is Christmassy.

Pictured above are my Snow nails, featuring a snowman, snowflakes and just snow in general. I remember considering whether or not I should add a top hat to the snowman’s head, but looking back I am relieved that I didn’t.
For this design I used Maybelline‘s Color Show Nail Polish in Cool Blue all over my nails. Using a normal white nail polish I painted as best a circle as I could manage on the lower part of my thumbnail for the snowman’s head. With a black dotting tool and orange striper from different Rio Professional Nail Art Kits I then added the details onto the snowman’s face.
For the snowflake I used a white striper from the aforementioned kit; this is easier to use if the nail polish is rather new because it is thinner and therefore easier to manipulate and manoeuvre. I didn’t want to go overboard with the snowflakes, so I only put a couple on a couple of nails and filled all the rest of the blue space with white dots using a dotting tool to represent falling blobs of snow.
 For my third and final design for this week’s Christmas Inspired Nail Art, I did some Christmas fairy lights. These really did not go as planned, but hopefully if you recreate this design, it will come out a lot better than mine (haha).
The first step to creating these nails is painting a normal French manicure on your nails. I then used my black striper from the Rio Professional Nail Art Kit to paint the black cable the lights are attached to. I tried to be creative with this by making it wavy and creating loops, rather than doing straight lines, so feel free to have fun with it.
With coloured nail polishes from the same kit, I used the dotting tool end to create the multicoloured lights by randomly placing colourful dots either side of the black cable. For this, it’s definitely better if you’re able to use bright colours. At the time I did this, I didn’t have a big selection of colours, so I ended up using red, yellow, dark green and dark blue.
So those are my three Christmas Inspired Nail Art designs for this week. Remember, if you missed last week’s designs, it has completely different designs, so please check that out here.
Which design was your favourite this week? Or which is your favourite out of them all so far?
Also, make sure you’re following me here and/or on any other social media account linked below so that you can be notified when next week’s Christmas Inspired Nail Art post is published.
-driftinglexi
Twitter | Instagram | Goodreads | Bloglovin‘ | YouTube


The snowmen nails are SO cute!
Saira
throughtheglitterglass,wordpress.com
xxx
LikeLiked by 1 person
Aw thank you!
LikeLiked by 1 person
These are so adorable! eeeee ❤ I was thinking of doing a Christmas nails post myself, but now I’m wavering becuase i won’t be able to compare to these! Aha.
LikeLiked by 1 person
Aw thank you! Do it! I’d love to see them!
LikeLiked by 1 person
Okay, I’ll try! aha
aha
LikeLiked by 1 person
How cute are those Chritmas trees.I need to ask my nail professiona if she can create something similar for the big day. 🙂 Thanks for sharing. Michele xx
http://www.chicuturnonglitz.blogspot.com
LikeLiked by 1 person
Aw thank you! Haha, I’d love to see her recreation!
LikeLike